Top | Materials | Construction | Other Braids | Use
This page describes a procedure for producing a variety of decorative Single-Strand Braid knots. The Wood Badge Woggle, a 3-lead, 4-bight braid, is a special case. This page provides diagrams which can be used to produce 3, 4, 5 and 6 lead braids.
Technically, these are knots, not braids, because braids are composed of separate interwoven strands. None-the-less, "braid" seems a most descriptive word for the beauty of this family of knots.
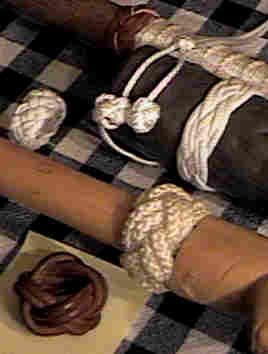
The samples on the right are (ccw from front left)
If you find the information in this page useful, please drop a dollar or two in an envelope and send it to my Boy Scout Council at Friends of Scouting, W.D. Boyce Council, BSA, 614 N.E. Madison, Peoria, IL, 61603. It will help my council and us volunteers continue to deliver "Good Scouting" to the youth of our area.
I would like to hear how you use the information. Please drop me an
Here is an animation to help you get the feel of the diagrams.
Top | Materials | Construction | Other Braids | Use
Braiding can be done with a variety of materials. Traditional Wood Badge Woggles are made from circular leather strips of about 3/16" diameter. Flat leather boot lace, nylon rope, and macreme cord are also popular.
Top | Materials | Construction | Other Braids | Use
The diagrams show the braid cut across and flattened. If it helps you visualize better, cut one out and roll it into a cylinder so that the numbers are connected.
The numbers at the bottom identify the "passes" involved in forming the braid. "1" is the first lead, and always consists of a simple wrap. "2" is the second lead, and may be more complex.
The numbers at the top of the diagram show the match-up of the lead for the next pass.
Braiding progresses from bottom of the diagram toward the top. When the top is reached, braiding continues from the bottom of the next braid picture to the right.
The diagrams show the current lead in a heavy line. When a lead passes under another, it is shown with a gap; When a lead passes over another, the other is shown with a gap.
The repeating section of the braid is marked by margin bars.

This description is based on the 4-lead, 7-bight braid with each lead repeated. A repeated lead is called a "chase." (This is one of the braids in the photograph.)
Start by deciding how many total passes (leads plus chases) will be involved. The number for a 4-lead braid is usually 4, 8 or 12. The picture at the top of this page uses 8 passes.
To estimate the total length of strand needed, start by holding the end of the strand in your palm under your thumb. Then wrap two or three fingers (loosely) as many times as you want passes in the braid, then about half-again more. This locates the point in the strand to begin the first pass.
When you start the third pass (lead), things can get somewhat confusing. It is essential to keep track of "where you are" on the diagram. To help identify the next lead to cross, note how many other crossings to go past per the diagram. (I lay a pencil on the drawing with its point at the last crossing that I have completed.)
When the basic braid has been completed, you may add additional passes (chases) along side the existing leads. In this case, the existing paths are followed one additional time until a total of 8 passes have been completed.
The final step is to "juggle" the end points back or forth to cause them to terminate behind the braid.
The braid should start out somewhat loose. It can be tightened later.
Top | Materials | Construction | Other Braids | Use
The patterns in the graphics can be applied to other braids as well. The 4-lead, 7-bight pattern can be applied for 11-bight, 15 bight (4n+3) by adding or subtracting a repeating pattern of 4 bights. A similar procedure extends the 4-lead, 5-bight braid to 9, 13, and 17 bights (4n+1). 3-lead braid patterns extend to 3n+1 and 3n+2 bights. 5-lead braid patterns extend to 5n+1, 5n+2, 5n+3, and 5n+4 bights.
Note that some braids can not be tied with a single strand. I have "filled in some of the gaps" on a separate page, Multi-Strand Braid Knots.
If you want some tailored pictures, scaled to help you visualize the finished product, check out this JavaScript. You specify the number of leads and bights and the width and length, then let the JavaScript draw the picture for you!

This is the braid that I used for the monkey fists. For this knot, the standing end enters through the open side of the braid circle and the working end gets an overhand loop, pulled tight, which is buried in the center of the braid circle as the leads are tightened.
With a second chase along each lead, this forms the classic Wood Badge Woggle.
With a second chase along each lead, this is an excellent cover for the ends of the hand grip on a staff.


The first three wraps of this 5-8 Braid are really easy! Just don't try to keep the zig-zag's crossing yet. Unless you are braiding wire, they just won't stay in place!
The 4th pass will require that the first three be tugged under or over into the correct position. Be sure to follow the diagram for whether to pull under or over. As the 4th pass of the braid is completed, it will lock the other wraps in place, so they must be right.
Note that the first wrap gets pulled under everything in preparation for the 4th pass, and the 3rd wrap stays on top of the 1st and 2nd.

Top | Materials | Construction | Other Braids | Use
Single-Strand Braids are useful as neckerchief slides and decorative wraps, for instance, for a stave.
It is not my purpose to promote any product, but for some very attractive examples of "Hand-crafted Knot Jewelry" based on these knots check out
Amazing!
The graphics are made from sawtooth splines, compliments of drafting software. The spline is copied numerous times and carefully overlaid. The resulting pictures are screen-captured into graphics software, which is used to add details and annotaions.
The process produces a single-strand braid knot if and only if the number of leads and the number of bights are mutually prime. If the condition does not hold, then the resulting knot requires more than one strand to complete, because a sequence of leads closes upon itself before traversing the entire knot. Many of these are described in Multi-Strand Braid Knots.
Top | Materials | Construction | Other Braids | Use
Latest update: 9/18/2008 to replace malformed GIF files
Copyright 1999, 2008 © by Stan Pope. All rights reserved. (Permission will probably be given, on request, to reproduce this material for use in Cub Scout or Boy Scout programs.)