
Top | Materials | Construction | Use
This page describes a functional, yet decorative Name Post that is suitable for personal use or as a special gift. It derives from the occasional need to post one's name if front of an otherwise indistinguishable item, such as your tent at the troop encampment. Material and treatment provide for long life. I have made several of these as gifts as well as for personal use.
Construction Summary:
If you find the information in this page useful, please drop a dollar or two in an envelope and send it to my Boy Scout Council at Friends of Scouting, W.D. Boyce Council, BSA, 614 N.E. Madison, Peoria, IL, 61603. It will help us continue to deliver "good scouting" to the youth of our area.
I would like to hear how you use the information. Please drop me
an
Top | Materials | Construction | Use
Materials:
Equipment:
Top | Materials | Construction | Use
If you expect to make more than one name post during the next year or so, you might prepare several at once, because the router setup is rather time consuming to accomplish the necessary precision.
This is pretty straight forward. Grain runs with the long dimension.
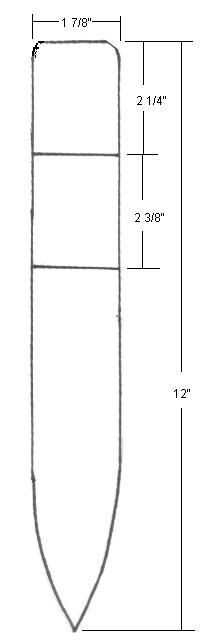
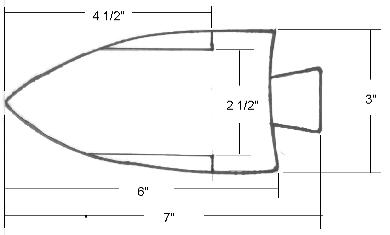
Sizes are approximate. You may easily juggle dimensions from run to run. However, for one run, the 3" dimension (on the 3X7) should be very consistent so that router setup holds.
Rough sanding can be done at this point. Most of the post surfaces and the 3X7 surfaces will be present in the finished product.
This step involves creating a 3/8" deep by 2 1/2" wide dovetail which will mate the two pieces across one another. The same height setting of the bit must be used for each piece.
The post dovetail is routed with the protractor guide. The lower edge of the dovetail may be set (located) using the fence (or a guide block set back from the router bit.) The upper edge of the dovetail may be set using a spacer (2 1/2" less the width of the bit) with the fence or guide block. Once the ends of the dovetail are set, rough out the interior by eye.
The dovetail on the arrowhead (3X7 piece) is cut from the tip of the arrowhead for a length of about 4 1/2". This is most easily done with a fence and stop. The fence adjustment controls the width of the dovetail. Therefore the width of the original 3X7 interacts with the fence adjustment. "Sneak up on" the correct adjustment from the waste side until the cuts (both sides) produce a snug fit with the post. Use a try-square to check that the ends of the dovetails (the locations of the stops) are even.
If multiple arrowheads are being routed and their widths are not exactly the same, cut the narrowest first, progressing to the wider ones, adjusting the fence as you go.
The final step is to square the ends of the dovetails on the arrowhead. This will allow the arrowhead to dovetail to the post almost seamlessly. Use a try-square to mark the ends of the squared-up dovetails. Then use a chisel to cut square the corner
Transfer the patterns to the wood pieces. Make sure that the arrowhead points the right way! Cut out with a band saw or jig saw.
Sand the cut edges to desired smoothness.
A 1/4" bevel on the top of the post will reduce splitting when the post is driven into the ground. The bevel may me made with a sander, saw or router.
Start with a small "chip" at the front tip of the arrowhead. Then work back along each front edge of the arrowhead, making "chips" approximately 1/2" long, separated by about 1/4". I like to do this with a carving knife, then finish with sandpaper wrapped around a 1" dowell.
Using a wood chisel or carving knife, taper the tail of the arrowhead.
Heat the special ring iron sufficient to blacken the "chip" areas. Use the wood burning iron to blacken the juncture between the arrowhead and it's tail section.
My preferred procedure is to use a sandwich baggy as a glove, grab a piece of cloth, dip it in the stain and spread it around the post. After it has had a few minutes to soak in, wipe it off with another cloth. If it isn't even or isn't dark enough, go after it again! When the color suits your taste, hang it to dry.
Cleanup your hands, if necessary, with "Goop."
Glue may be used when assembling the pieces. Try to avoid spreading the glue around too much. With the separate pieces, apply glue only to the slanted dovetail only. As the pieces approach their final position, put a small amount of glue on the back of the arrowhead where it will slide under the post. After the final position has been reached, brush a small amount of glue in the groove between the post and forward part of the arrowhead. Carefully wipe away all excess glue.
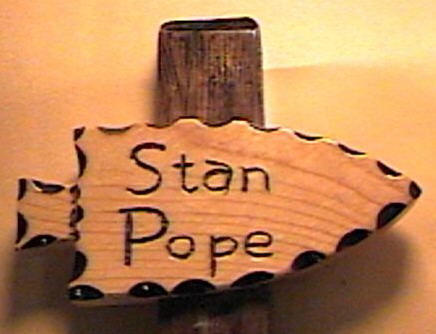
Sketch the name on the face of the arrowhead using the font of your choice. Draw lightly, with a soft-lead pencil so that if you have to start over, the marks can be removed with an eraser or fine sandpaper.
Once the name is laid out in pencil, use a small gouge or craft knife to cut a narrow grove where the marks of the letters should be. The gouge does not need to be deep, because the wood burning iron will deepen the marks. 1/16" wide and deep is sufficient.
Now, use the wood burning iron to darken the lettering. It helps if the arrowhead can be clamped to a table top with a movable bridge above it to support your hand. Strive for a smooth, even stroke with consistent width, depth and darkness.
Use spar varnish to coat the name post. Several coats are needed. Follow the instructions on the container.
Spar varnish provides a durable coat that is resistant to damage from moisture and impact.
Top | Materials | Construction | Use
Your name post should be used in a place that it will not trip you or your guests. A front corner of your tent usually has no traffic. You may place it just forward of the obligatory fire-bucket! You might even loop the fire-bucket handle over the top of your name post to prevent tipping.
When installing your name post, either press into the ground by hand, if the ground is soft enough, or drive it into the ground with a large-face mallet. Avoid using small-face tools, such as a carpenter's hammer, as this will tend to split the top of the post.
Top | Materials | Construction | Use
Latest update: 11/15/98
Copyright 1998 © by Stan Pope. All rights reserved.