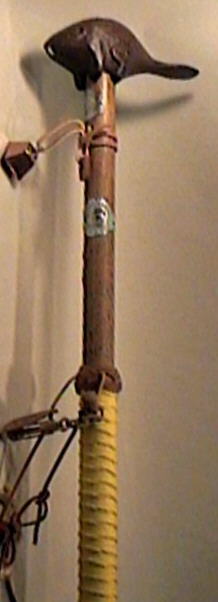
The Walking Stick is a very interesting and expressive craft. A walking stick can tell the history and nature of it's owner. After a time, it becomes very personal, because of the design of its mast head and the memories that attach to its memory strands.
I have made several of these as gifts for very special occasions... usually something like a Cub Scout Trainer Wood Badge "beading". My "sticks" stretch from Detroit to Dallas.
If you find the information in this page useful, please drop a dollar or two in an envelope and send it to my Boy Scout Council at Friends of Scouting, W.D. Boyce Council, BSA, 614 N.E. Madison, Peoria, IL, 61603. It will help us continue to deliver "good scouting" to the youth of our area.
I would like to hear how you use the information. Please drop me
an
Top | Materials | Preparation | Hand Grip | Head | Foot | Other
Although you can use anything from a sapling to a broomstick, I prefer to use the scout stave as sold in the BSA catalog. Length and strength consistency satisfy my personal requirements.
Other materials include about 12 feet of leather boot lace, a small piece of 1/8" thick leather, a small sheep bell, and a hank of polyester craft and rug yarn.
The mast head may be carved or scrounged. For carving, I like 2" thick bass. I have also formed mast heads from 2" cubes of maple with one corner cut off and drilled (1" diameter by 3/4" deep).
Top | Materials | Preparation | Hand Grip | Head | Foot | Other
If you expect to make more than one walking stick during the next year, you might prepare several sticks at once, because this is a rather messy step, and has lots of "wait time."
I prefer to attach mast heads by drilling a 1" hole in the base of the mast head and shaping the top of the stick to a 1" post which fits into the mast head. The base of the mast head and the shoulder of the post need to be quite flat, so that they mate well without gaps.
Lacking a specific shaping tool, I produce the shoulders by miter cuts (90 degree) across the stick and about 3/4" below the top. On a scout stave (1 1/8" diameter) these would be 1/16" deep all around, producing a diameter of 1" then shave from the end toward the cut to chip away the wood until its diameter is reduced to 1". It is useful to keep a gage consisting of a piece of pine with a 1" diameter through hole to assess progress on the shaving.
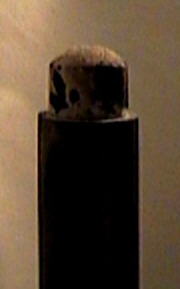
The end of the post is rounded, so it is useful to cut most of that dome off. Leave a bit of it, to simplify insertion of the post into the mast head.
Finally, drill a 1/8" hole through the post to use for hanging while the staff is drying. A bent piece of hanger wire is handy for hanging the staff.
Sand the shaft and foot of the walking stick with progressively finer sandpaper. Pay special attention to reducing the roughness of the bottom, which is often quite rough when new. The rounded foot of the staff can be turned while the staff is pushed into a piece of sandpaper in your other hand. Be careful only to sand across grain on that cut portion of the staff. The main part of the shaft should be sanded with the grain. This is readily accomplished be sliding the shaft back and forth through a piece of sandpaper that is held around the shaft by your other hand. For best results, turn the shaft slightly for each stroke.
Let your artistic bent take over. My preference is for a dark walnut stain, but you can even use left-over coffee, if you like!
My preferred procedure is to use a sandwich baggy as a glove, grab a piece of cloth, dip it in the stain and spread it around the staff. After it has had a few minutes to soak in, wipe it off with another cloth. If it isn't even or isn't dark enough, go after it again! When the color suits your taste, hang it to dry.
Cleanup your hands, if necessary, with "Goop."
When the stain is dry, sand it very lightly with very fine sandpaper. Then wipe it down with a tack cloth to remove any remaining particles. A bit of linseed oil in a clean, dry cloth works well as a tack cloth.
Here is the fun part! This is done without the plastic baggy glove! The reason is that the heat from your hand is an important part of the process.
Stir your linseed oil a bit, pour a small amount in a shallow container, such as a tuna fish can. (1/8" deep is more than enough!)
Dip a clean rag in the linseed oil and spread the linseed oil lightly on the staff. Using your bare hand, urge the linseed oil into the wood by rubbing your hand along the length of the staff. If more seems to be needed, dip your fingers into the linseed oil. Stop adding linseed oil when the wood quits taking it in. Hang the staff to dry for a day or so.
Clean up your hands with soap and warm water.
Top | Materials | Preparation | Hand Grip | Head | Foot | Other
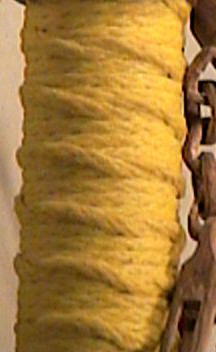
A wrap of colorful, decorative yarn, such as rug yarn, makes an attractive hand grip. The hand grip should cover a length of 9 to 12" of the shaft and be located a comfortable height from the bottom end of the shaft.
The wrap starts with a clove hitch (short end down), at the bottom end of the hand grip. A spot of instant drying cement will help hold the knot firmly in place. The "wrap" is formed by "casting on" loops of yarn around the shaft, with the knot gradually shifting around the shaft to form a spiral. Consistent tension is necessary for the spiral to be constant. Spirals of 1/2" to 1" separation along the shaft are typical. The tighter the wrap, the shorter the separation.
Finally, at the top of the wrap, lock the knot with another spot of
instant drying cement.
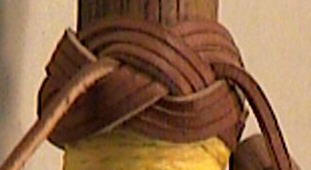
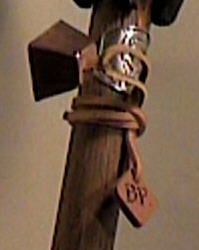
A three-strand five-bight version of the Turk's Head Knot as described in this page makes a very effective cover for the ends of the wrap. These knots are formed separately from about 72" leather boot lace, and adjusted in size until the slip snugly over the shaft and wrap. Before finally fastening the Turk's Heads in place, attach "memory strands" to the shaft with 1/2" brads. To do this you may have to slide the knot above it's final position, attach the memory strands and then slide the knot back down into place.
The picture at right shows the "memory strands" integrated in the knot. That is an older technique that I have replaced with the method described in this document.
Top | Materials | Preparation | Hand Grip | Head | Foot | Other
Cut a 2" cube from wood. Cut one corner off the cube so that each side of the resulting equilateral triangle is approximately 2". Then drill about 3/4" deep into the center of the triangular face, being careful to make the hole perpendicular to the face. The corners of the triangle can be located by measuring 1.4" out from one corner of the cube, then connecting the dots!
Cutting is tricky. Try cutting a smidgen on the waste side of the lines, then sand the flat surface down to the lines.
Drilling can be tricky too. My best results have come by using a 1" Forstner bit in an ordinary drill press. Center the drill over the hole in the drill press plate. Use three equal thickness strips of wood, approximately 1/4" thick, against the top faces of the cube, and place the combination in the hole of the drill press plate, so that the strips of wood protect the cube from contacting the plate. Adjust the thickness of the wood according to the diameter of the hole in the plate. Just remember to keep all three sides of equal thickness.
Now, jiggle the cube until the top triangle face is level, i.e. perpendicular to the drill. Try the drill against the face to assure that it is centered. When all is centered and held in place, drill the hole 3/4" deep!
Decoration of the cube can take many forms. One idea that I have
used is woodburn scout symbols onto the top 3 faces. Another idea is
to burn the recipient's initials or Den totem or council name into a
face. Still another is to paint the Cub Scout badges, e.g. Wolf, Bear
and Webelos, on the three square faces and paint silver arrowheads
on the lower three faces.
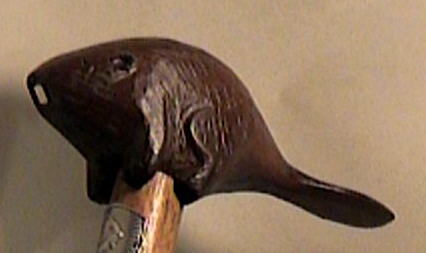
My wife's stick has a Beaver perched on the top, with four feet hugging the staff and tail out at attention. Another friend has a Fox sitting on a flat grassy knoll.
I won't pretend to give carving instructions... Either you can do it or you can't. If you can't and want to learn, find someone local to instruct you.
However, there is a best order to do things: Sketch, drill, carve!
Top | Materials | Preparation | Hand Grip | Head | Foot | Other
If your staff will be used for ceremonial purposes, the linseed oil coating is probably sufficient. If it is going to be jammed against dirt and rocks, then more protection is in order. Several coats of spar varnish will protect it against water and dirt, but for heavy-duty walking, try a rubber crutch tip or a 1 1/8" O.D. by 1" long brass tube. Install by reducing the outside diameter of the staff as was done for the mast head. Lock in place with cement. Coat the exposed wood center with spar varnish.
Here is one I learned at the Leaning on a Stick course at Ft. Campbell HOW WOW a few years ago: Find the brass from a spent large caliber ammunition round. Heat it in a secluded fire to assure that there is nothing explosive left inside. Use a punch to remove the primer (from the inside, down the center of the cartridge.) Cut the brass to approximately 1" long. Shape the tip of the staff to fit snugly into the round. Attach the brass using a drywall screw through the primer hole and into the wood of the walking stick. (In the Leaning on a Stick class, the walking sticks were "Cub Scout sized", so 12 gauge shotgun shells were about the right size. A scout stave calls for some "serious ammunition".)
Top | Materials | Preparation | Hand Grip | Head | Foot | Other
Some of the decorations which I especially like are "memory strands" and a section above the hand grip holding a bell and tag. These are my own concept and design, although certainly others have done something similar before. For some background on the reason for the bell, I invite you to read The Legend of the Bell.
Memory strands are lengths of leather boot lace attached to the stick underneath the Turk's Head knots, usually the lower knot. They may be 18" to 24" long. Two under each knot are about as many as you should use lest the stick appear overburdened.
"Memories" are threaded onto a lace and held in place by a simple overhand knot. Depending on size, a separation of about 3" looks pretty good. The "memories" may be such mementos as patches or carvings. One "memory" I have planned for my stick is crystal containing ashes from my Vigil campfire.
The tag is a small (about 1" to 1.5") square of leather with the owner's
name or initials and the date of origin burnt into it. After burning and
punching, the square may be stained and sprayed with a protective
such as "Saddlelac".
A small brass or copper colored 1" sheep bell and the tag are
threaded on a length of boot lace about 10" long. The lace is folded
into a figure-8 with the bell on the top and the tag on the bottom. The
center of the figure-8 is laid along the length of the stick about 4"
above the top of the hand grip and fastened in place with 1/2" brads.
The brads should be side by side. Finally, a length of boot lace is
used to form a clove hitch around the stave and over the brads to
"hold the attachments in place." About 1" of lace should protrude from
each side of the clove hitch knot.
Top | Materials | Preparation | Hand Grip | Head | Foot | Other
Latest update: 11/13/2008
Copyright 1998, 2008 © by Stan Pope. All rights reserved.